


Table of Contents
What Is a Subscription Cancellation?
Cancelling subscriptions on iPhone is the process of stopping the automatic renewal of services or apps that you are currently subscribed to. This action ensures that you no longer incur charges for services you no longer wish to use.
Importance of Cancelling Subscriptions:
- Financial Control: Prevents unwanted charges and helps manage your budget effectively.
- Service Management: Ensures you are not paying for services or apps you don’t use.
- Avoid Clutter: Keeps your iPhone free of unnecessary services and subscriptions.
Steps to Cancel Subscriptions:
- Open Settings: Start by accessing the Settings app on your iPhone.
- Access Apple ID: Tap on your Apple ID, which is typically your name at the top of the screen.
- Select Subscriptions: Choose the Subscriptions option from the menu.
- Find and Select: Browse through your list of active subscriptions and select the one you wish to cancel.
- Cancel Subscription: Tap on Cancel Subscription and confirm your decision.
Why It’s Important to Manage Your Subscriptions
Managing your subscriptions is essential for both financial and practical reasons. Regularly reviewing and adjusting your subscription settings can help you avoid unnecessary expenses and keep your iPhone organized. Here’s why it’s crucial:
- Financial Savings:
- Avoid Unwanted Charges: Regularly managing your subscriptions ensures you don’t continue paying for services you no longer use. Learning how to cancel subscriptions on iPhone helps prevent unexpected charges.
- Budget Control: By keeping track of your subscriptions, you can allocate your budget more effectively and avoid overspending.
- Service Relevance:
- Update Your Preferences: Subscription needs can change over time. Managing them helps ensure that the services you are paying for still meet your current needs.
- Cancel Unused Services: If you find that you are no longer using certain apps or services, knowing how to cancel subscriptions on iPhone allows you to stop payments and declutter your subscription list.
- Device Organization:
- Reduce Clutter: Managing subscriptions helps keep your iPhone free from unnecessary apps and services that may not be actively used.
- Streamlined Experience: A well-maintained subscription list enhances your overall user experience, making it easier to manage and navigate your device.
- Prevent Auto-Renewal Issues:
- Avoid Unexpected Renewals: Subscriptions often renew automatically, which can lead to unexpected charges if not properly managed. Understanding how to cancel subscriptions on iPhone ensures that you are not caught off guard by auto-renewals.
How to Cancel Subscriptions on iPhone
If you want to stop recurring payments for apps or services on your iPhone, knowing how to cancel subscriptions on iPhone is essential. Here’s a step-by-step guide to help you through the process:
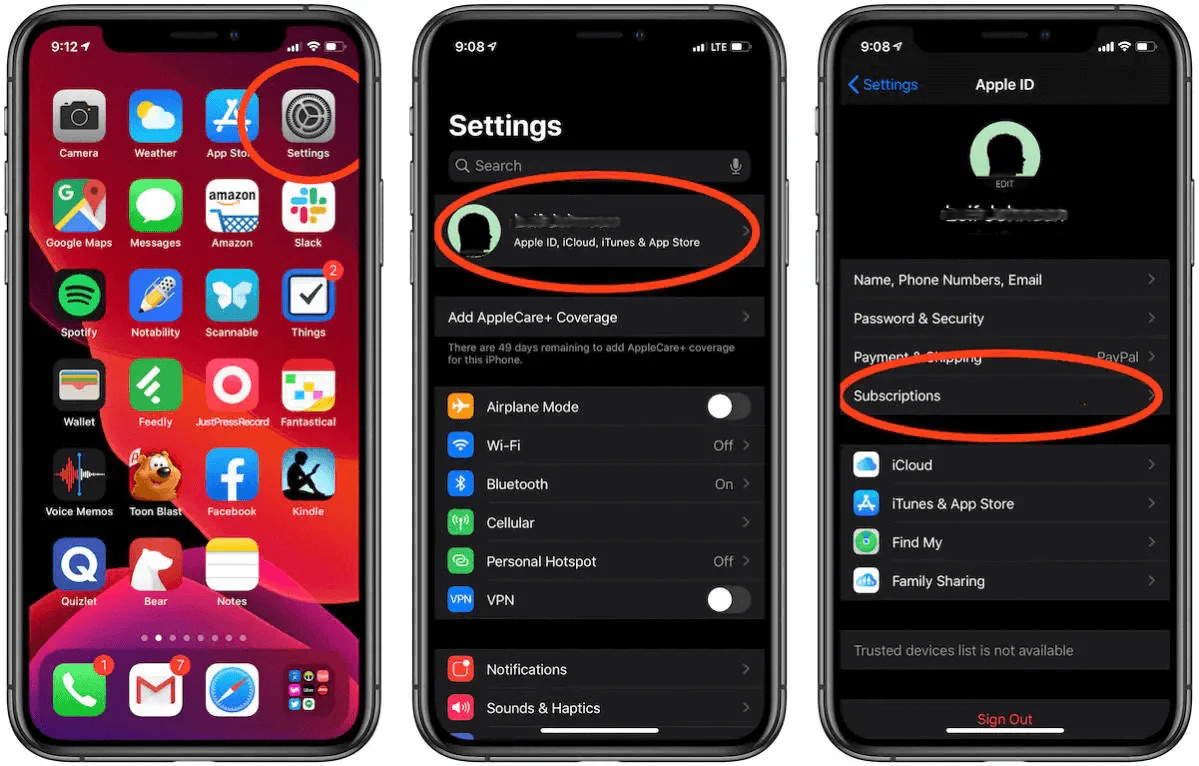
In The Settings App
- Open Settings: Tap the Settings app on your iPhone home screen.
- Access Apple ID: At the top of the Settings menu, tap on your Apple ID (your name).
- Select Subscriptions: Choose Subscriptions from the list.
- Find Your Subscription: Browse through your active subscriptions and select the one you want to cancel.
- Cancel Subscription: Tap Cancel Subscription and confirm your choice when prompted.
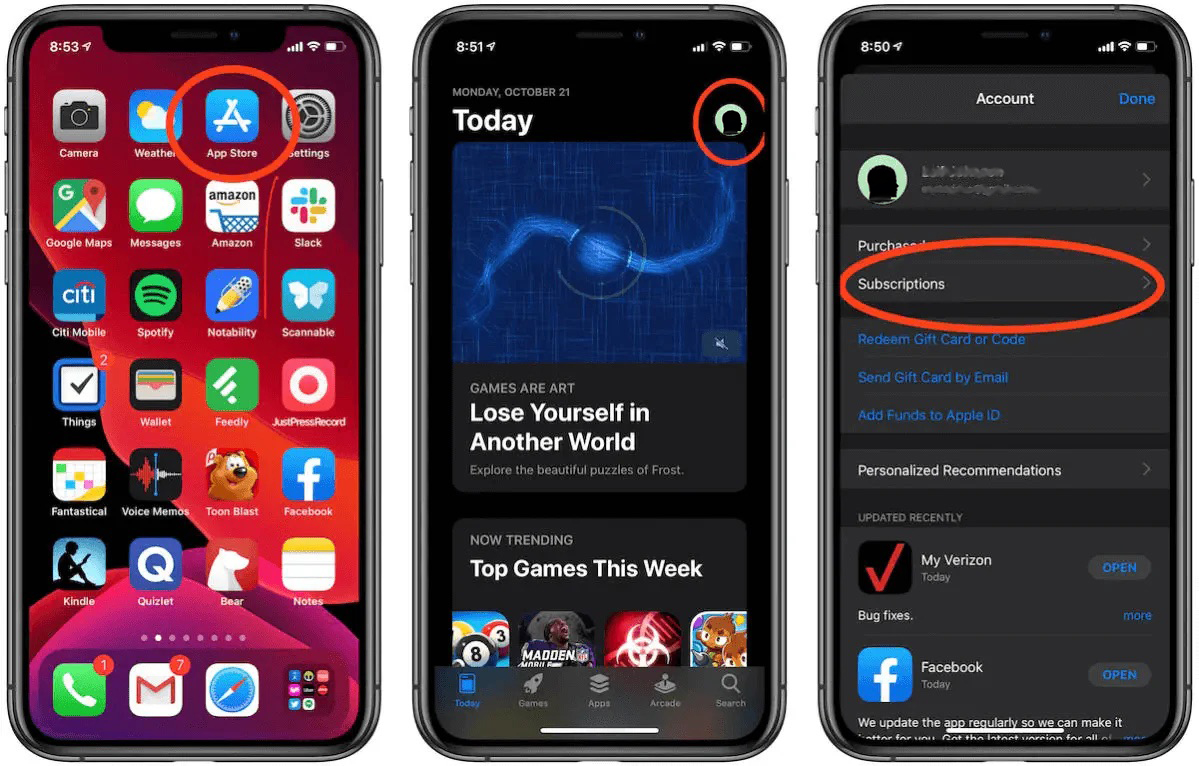
In The App Store
- Open App Store: Launch the App Store on your iPhone.
- Profile Icon: Tap your profile icon in the top right corner.
- Access Apple ID: At the top of the Settings menu, tap on your Apple ID (your name).
- Subscriptions: Click Subscriptions from the list.
- Choose Subscription: Find and tap on the subscription you wish to cancel.
- Confirm Cancellation: Tap Cancel Subscription and follow the on-screen instructions to complete the process.
Common Issues and Troubleshooting
When learning how to cancel subscriptions on iPhone, you might encounter a few common issues. Here’s how to resolve them:
- Subscription Not Visible
- Ensure Correct Apple ID: Make sure you’re signed in with the Apple ID that was used to make the subscription. Subscriptions are linked to your Apple ID, and if you’re using a different one, you may not see the subscription listed.
- Check Subscription Status: Sometimes, subscriptions might not appear immediately. Wait a few minutes and check again.
- Unable to Cancel Subscription
- Restart Your iPhone: A simple restart can resolve many issues. Turn off your iPhone, wait a few seconds, then turn it back on and try cancelling the subscription again.
- Update iOS: Ensure your iPhone is running the latest version of iOS. Go to Settings > General > Software Update to check for updates.
- Subscription Charges Continue
- Verify Cancellation: Confirm that you completed the cancellation process. Go to Settings > Your Name > Subscriptions to check if the subscription is listed as cancelled.
- Contact Support: If charges continue despite cancellation, contact the app’s support team or Apple Support for assistance.
- Issues with Specific Apps
- In-App Subscription Management: Some apps manage subscriptions directly within their own settings. Open the app and check if you need to cancel the subscription from within the app itself.
- App Support: Reach out to the app’s customer support if you’re unable to cancel through the usual methods.
Additional Tips for Managing Subscriptions
Effectively managing your subscriptions on iPhone helps you maintain better control over your expenses and keeps your device organized. Here are some additional tips to help you stay on top of your subscriptions:
- Regular Review
- Check Subscriptions Periodically: Make it a habit to review your subscriptions every few months to ensure you’re only paying for services you currently use.
- Set Reminders: Use a calendar app or reminder tool to alert you to review your subscriptions regularly.
- Utilize Subscription Management Apps
- Track and Manage: Consider using apps designed to track and manage your subscriptions. These apps can provide an overview of your active subscriptions and upcoming renewals.
- Examples: Apps like Truebill or Trim can help monitor and manage subscriptions.
- Be Mindful of Free Trials
- Watch for Auto-Renewals: Many free trials automatically convert to paid subscriptions. Be aware of trial periods and cancel before the trial ends if you decide not to continue.
- Set Calendar Alerts: Set a reminder to cancel a free trial before it converts to a paid subscription.
- Read Subscription Terms
- Understand Terms: Before subscribing, read the terms and conditions, including renewal policies and cancellation procedures.
- Check Refund Policies: Some services offer partial refunds for unused periods after cancellation. Review the refund policy to understand your options.
- Use the App Store for Management
- Manage Easily: Use the App Store to easily view and manage your subscriptions. Go to App Store > Profile Icon > Subscriptions to access your subscription list.
- Contact Support for Issues
- Seek Help: If you face difficulties or have questions about managing or cancelling subscriptions, contact the app’s support team or visit Apple Support for assistance.
By following these tips, you can effectively manage your subscriptions, avoid unnecessary charges, and ensure you only pay for services that are valuable to you.
is a skilled Web Developer and Designer. He builds and designs websites that focus on best UI/UX practices. Justin is also a Verizon Product Expert at Victra, helping customers with Verizon products and services. His mix of design, coding, product, and general knowledge makes him a valuable and knowledgeable team member.